How to Get Around COTA…Fast!
By Jonathan Haswell In Feature Articles, Game NewsSimraceway Performance Driving Center instructor Matt Bell is one of a select group: a driver who has taken on Circuit of The Americas twice. In fact, in March of this year the Californian got up-close-and-personal with the Austin circuit twice in one day—once in a Chevrolet Camaro SS GS.R, and once in an Audi R8 LMS.
So who better than the expert GT racer, who has placed second in the Continental Tire Sports Car Challenge Series Driver’s Championship (GS Class) two years in a row, to guide us through a lap of COTA in our R8 LMS ultra–as Simraceway players battle to record the quickest times with that same car/track combo and qualify for the 50th Sunday Race-Off?
Read on to benefit from his video and guide, which is also available to download as a PDF.
Check out this detailed turn-by-turn guide prepared by Matt, who also passes on his expertise at our real-world racing school. Used in conjunction with this video of him pulling the fourth-fastest GT car lap in his R8 LMS during the GRAND-AM of The Americas, you won’t find a better way to shave those all-important times and make it through to SRO50!
Click HERE (small) and HERE (large) to get your downloadable PDFs of this guide, which you can print out and refer to.
[embed width=”620″ height=”349″]http://www.youtube.com/watch?v=k8baJVZeNO8[/embed]
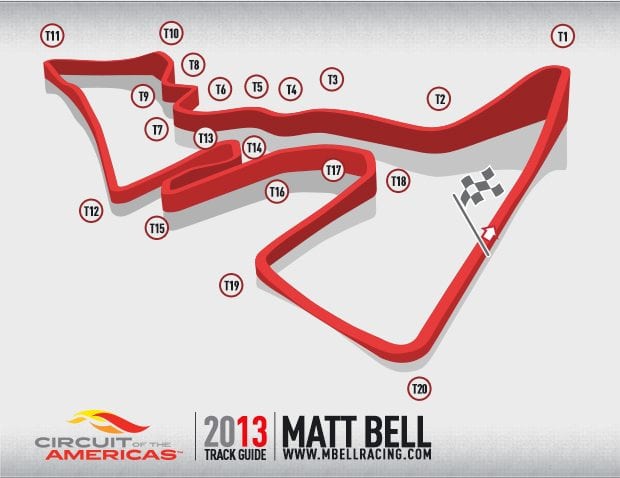
Matt Bell’s Circuit of the Americas Track Guide

Turn 1’s uphill braking zone means you can brake quite a bit later than you might think. However the sharp crest usually means there’s a big penalty for braking too late! The trick is to turn-in while you’re still on the uphill (turning-in too late will result in massive understeer). This sometimes feels too early, but if done correctly, the cambering helps the car hook-up toward the apex.
The apex of Turn 1 is relatively level, but the track-out is steeply downhill. Because the corner has a slow apex speed, the goal is usually to “park it” and get to full throttle as quickly as possible. However full throttle combined with the downhill exit can cause oversteer, so the best option is to use the level section of track to over-rotate the car so that full throttle is accompanied by less steering as the track falls away. If done correctly, the car will still wind up right at the exit curbing without any wheelspin or oversteer.

Pro Tip: Turn 2 is the entrance to a very high-speed section—in some cars, it is essentially a straight—so it needs to be setup correctly to ensure the highest-possible average speed can be achieved.
Pro Tip: This was the Audi R8 LMS’s best section—and key to establishing a fast lap time with the car.
The exit of Turn 1 needs to be followed by an abrupt setup against the opposite side of the track, in preparation for Turn 2. Many drivers attempt to turn-in from the middle of the track, but this rarely nets a better lap time.
This corner appears to have very little elevation at first but, as speed increases, what elevation changes there are begin to highlight handling characteristics. The run down to the apex is slightly downhill and cambered, but the apex itself is in a valley, which causes some apex understeer. The key is to deal with the understeer as much as possible here, because the exit is uphill and cambered.
Usually, it doesn’t take much more than a light “chicken lift” to get the front end to bite at the apex, but don’t over-slow! The apex curbing has some waves to it, but it is not an aggressive ramp. It can be used to tighten up the car—and add a few feet to the track width.

Pro Tip: In this “esses” section (Turns 3 to 6), the goal is not to continuously accelerate as with many other tracks, but rather to do the opposite. Each corner in the section is slightly tighter than the last, which means the first of them should be the one you brake/lift/steer for the least.
Pro Tip: The apex curbing across this whole section is usable, which allows you to add a foot or so to the radius of the corners. Depending on track layout and car setup, the inner curbs can also be used. However they are intentionally rough and any change in steering or longitudinal attitude while crossing the inner curbing can cause an unpredictable change in handling.
Setting up for this turn essentially involves pulling the car to the middle of the track from the exit of Turn 2. Quick-but-smooth steering and foresight are key here—it’s easy to get greedy and focus so much on apex speed that the exit becomes messy.
The slight elevation drop at the exit of Turn 3 doesn’t really hinder power-down performance, as relative speed is very high. It can, however, place the car too close to the inside for turn-in to Turn 4. As with all the corners in this section, these two are connected, and a narrow entrance to Turn 4 can often be traced directly back to how the car entered Turn 3.

The entrance to Turn 4 is at the same elevation as Turn 3, but its exit, just past the apex, is slightly uphill. This means it’s easy to over-speed the entrance and save the car a bit by the exit. However this tactic should be performed with a degree of caution as the exit of Turn 4 is also the apex of Turn 5.

Turns 5 and 6 can be strung into one long, double-apex corner. The apex to Turn 5 can be very fast—often full-throttle. The “pooch” between the apexes of Turn 5 and Turn 6 is where speed can be bled off (sometimes, this can be achieved by a mere lift on the throttle, but often it means a light graze of the brake). Since the car is using so much of its tire laterally, longitudinal load should be cautiously applied. It may help to open the hands for a moment to slow, and then tighten up again with some maintenance throttle as the car heads to the second apex.
The second apex is at the crest of a hill. It is often a much more aggressive feature than it appears, as the car is working hard here to slow and change direction. The goal is to have an extremely late apex, with almost no movement away from the apex curbing once there (because Turn 6 leads into a very tight corner with a downhill entrance). Power can be applied to increase average speed after the second apex at Turn 6, but be careful, especially if applying throttle at the crest of the hill—the track is often very slick here.

It is wise to set up for the apex of Turn 7 in the middle of Turn 5. The turn-in point is sharply downhill but the track levels off near the apex, so the car usually tends to be loose on entry, have good balance at the apex, and push post-apex.
It is rare that a car will be able to handle exiting against the right side of the track while still setting up for Turn 8. Earlier throttle with less steering at the apex of Turn 7 will offer the best acceleration, but will choke the entrance to “8”. Cutting tighter at the apex of Turn 7 will mean a wider radius at Turn 8, but it means more slowing earlier in the complex. Every driver will find a happy medium between a wide exit and no exit at all.

Pro Tip: It is easy to get greedy with apex speed at Turn 8, which is an uphill and, essentially, blind exit. A keen driver will realize that this corner actually sets up for a very long straight (and one of the few “easy” passing zones on the track). Therefore, if you can control your entry and exit, you will vastly increase your chances of passing and decrease your chances of being passed.
The most common tactic on Turn 8 is to apex early—taking advantage of the uphill entrance—and, once on the apex curb, hold it all the way until turn-in for “9” (bear in mind, however, that using the apex curbing can carry the risk of oversteer as the step up overloads the outside-rear tire).
Throttle should be cautiously applied while still on the curbing (the purpose of this is to move some weight to the rear of the car and “prime” the back tires to stay glued to the surface on turn-in for Turn 9) but, the moment the car changes direction to head for “9” (this direction change can feel very aggressive!), it’s time for full throttle (the ultimate goal here is be “wide open” for as long as possible on the downhill run to Turn 11).
Once at Turn 9, jump the apex curbing and, as accurately as possible, land the edge of the outside tires on the outer edge of the red-and-white exit curb. The track seems narrow here, so every inch counts.

Find a way to make Turn 10 “flat”. If the car isn’t full throttle the whole way through, you need to go back and fix something in Turn 9. The apex is blind until it’s too late to turn-in, so pick a turn-in point and trust it. The curb is flat, but the steep drop downhill at the apex is rougher on the inside of the track, so early turn-in just makes for a rougher landing. As soon as the apex is visible, pick a spot on the exit curb and focus on it. Keep your foot to the floor and trust the car.

Pro Tip: This is one of the most important turns on the track—its braking zone is one of the best passing points and its apex leads to the longest straight on the course.
Turn 11’s braking zone can be tricky. It starts downhill, but bends uphill before the apex. A nervous braker will find it hard to build up to their minimum braking distance. The best thing to do is to pick a braking point, move it in 6 inches at a time, and “trust the physics”.
The apex is only slightly “later-than-geometric” and is very slow. Your goal is to see full throttle as early as possible, so wasting time sliding past the apex won’t produce the earliest top speed on the long Back Straight. A close-to-geometric apex will get the car to the track-out point before the road heads downhill again.
Most cars benefit from over-slowing at “11” and getting immediately to full power (although mistiming the roll to power can sometimes cause a snap-to-oversteer at late-exit).

The entry to Turn 12 is downhill, but the apex is cambered and the exit is level or slightly uphill. This means you can turn-in a bit early and let the car catch at the apex. Because the apex is still downhill, the car is usually pitch-sensitive and can see some big oversteer with a mistimed brake release or return to power. It is usually best to overcharge the apex to induce mild understeer and then return to power a bit later, to ensure stability.

As soon as you exit Turn 12, you need to get back to the left in order to setup for Turn 13. However car placement is hindered by the track’s slightly “bent” outer-edge. The Turn 13/14 complex can be tackled as a single, double-apex corner. The first apex is the slower of the two, but it shouldn’t be over-slowed—you should brake just enough to let the car “float” to the outer-edge of the track. Once there, you then need to return to power and carry good speed across the second apex in order to setup straight into the tight Turn 15.

Pro Tip: There will always be a trade-off in different lines at Turn 15. A tighter line, following the left side of the track, covers far less distance, but requires a tighter radius at the final apex. A wider line—or one that uses more of the outer edge of the course—covers much more distance, but will have a much wider radius at the apex, allowing for a higher average speed. The line you choose should depend on your individual strengths and your car’s ability.
Some drivers view this as a single, slow corner and will often shoot far right off Turn 14, thus widening the radius at Turn 15. However the most popular technique—and the one that worked for the R8—is to tackle it as a double-apex corner.
You will likely be exiting Turn 14 against the left-side of the track and at full throttle. Just before you reach the curbing on the left, you should aim toward the middle of the track, allowing for a wide radius to trail the brakes (braking is done almost entirely while steering, so drivers that are good trail brakers will do very well here). At the appropriate moment, the steering should be increased to tuck the car down to the very slow “second apex”. As with Turn 11, the goal on exit is to find full throttle as soon as possible.
Pro Tip: As steering is increased on Turn 15, it is common to see the inside tire lockup, but that’s not always a terrible trait. If the tire has just barely stop spinning, it is usually light enough to ramp over the large apex curb without upsetting the car. On such a tight section of track, that extra foot can drastically improve the roll to full throttle.

This triple, right-hand complex of corners can be one of the most important on the track. It is extremely high-speed and how you tackle it can drastically affect your lap time.
The first two apexes are relatively level, with a slight increase in elevation after the second. There is, however, a steep drop right at the third apex that can upset the car’s balance. The end goal here is to be as fast as possible across the final apex, which sometimes means slowing slightly for the first (regardless of how tempting it is to be at full throttle). The usual tendency for cars is to be neutral at “16”, then push at “17”. This push can often snap-to-oversteer at the crest at the apex of Turn 18.
Pro Tip: It is relatively common practice to miss the first apex. How the final two apexes in the complex should be taken relates to the car’s balance. A car that tends to have high-speed understeer will likely over-slow and be wide at “17” to be tucked up against Turn 18 with full throttle (saving the car from scrubbing the front tires downhill). A car with a tendency to have high-speed oversteer, meanwhile, will often get close to the second apex, and widen the line by Turn 18 to reduce the steering angle while at full throttle.

As soon as you have exited “18”, you’ll need to quickly pull the car to the opposite side of track, before braking for Turn 19—one of the most challenging corners at COTA. In fact, due to the proximity of the two corners, you may need to start braking before you’ve reached the right-hand side.
The apex is slightly downhill and the curbing is very flat, making it difficult to spot the apex early. The drop downhill also limits the car’s ability to trail the brakes in very deep, meaning brake release happens early. There is often good grip at the apex, but post-apex is slightly de-cambered and continues downhill. If too much speed is carried across the apex, the return to throttle can cause oversteer at exit.
Usually, the fastest way through Turn 19 is to over-slow and over-rotate very slightly at the apex so full throttle can be applied immediately, accompanied by an opening of the hands. If understeer is carried across the apex, the car can fail to resume front traction downhill or it can snap-to-oversteer.

The final corner on the track before the timing stripe, Turn 20 is very important if you’re on a flying lap. The entire corner—and the entire Main Straight—is uphill.
Braking here is easier than it seems, and the car can be slowed with heavy trail braking to the apex. The apex curbing is completely flat and can usually be used without any handling issues. The exit curbing can also be used in order to widen the track. The best plan for this corner is to spot the exit curb before the car is turned in and guide the car, as accurately as possible, to it. Thanks to the uphill exit, if the car is stable and balanced at the apex, full throttle can be applied almost immediately.
And that completes Matt Bell’s Hot Lap of COTA in the Audi R8 LMS ultra. We’d like to thank Matt for taking the time to share with us the amazing insight and detail that Simraceway Performance Driving Center students benefit from all the time.